
Related Products

NZXT H510 - CA-H510B-W1 - Compact ATX Mid-Tower PC Gaming Case - Front I/O USB Type-C Port - Tempered Glass Side Panel - Cable Management System - Water-Cooling Ready
case

NZXT H510 - CA-H510B-B1 - Compact ATX Mid-Tower PC Gaming Case - Front I/O USB Type-C Port - Tempered Glass Side Panel - Cable Management System - Water-Cooling
case

ASRock MB TRX40 Creator AMD Ryzen Threadripper sTRX4 TRX40 Max256GB DR4 ATX
motherboard
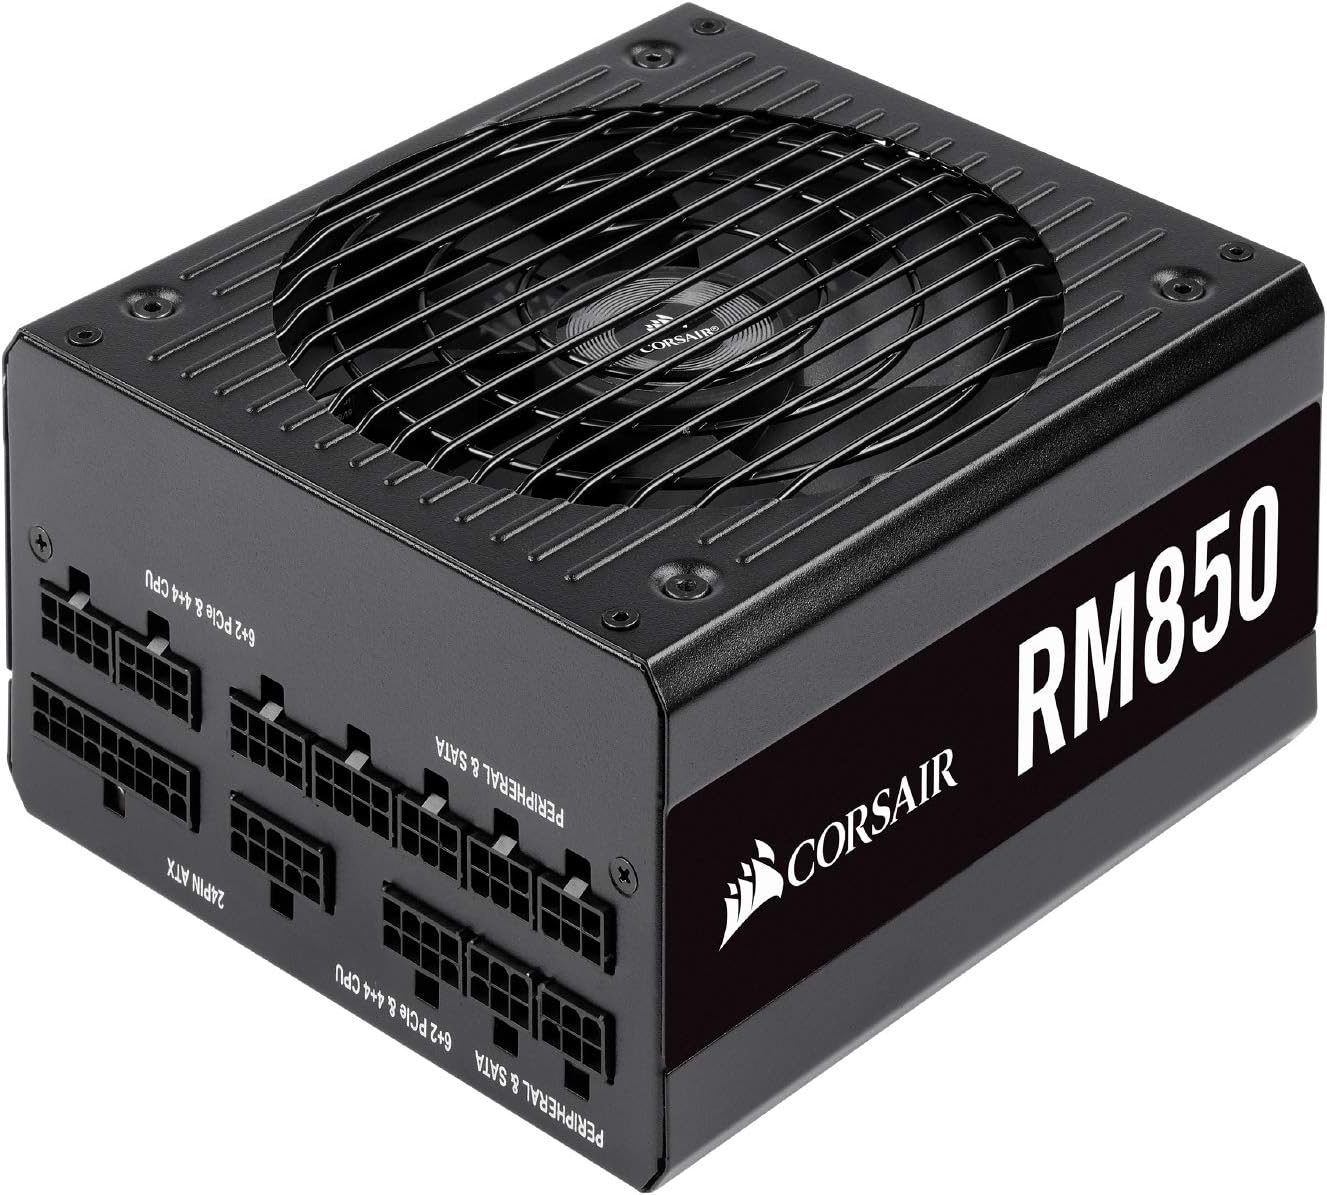
Corsair RM 850 Series, 80+ Gold Certified 850W Fully Modular Power Supply
power supply
Silverstone Tek Micro-ATX, Mini-ITX Mid Tower Computer Case
3.7 (109 ratings)
N/A
Key Features
- Quick access filters to prevent dust buildup
- Motherboard back plate opening for quick CPU cooler assembly
- Support four expansion slots cards up to 14.1 inches long
- All black painting inside with stylish look
- Highly flexible drive storage options
Specifications
* The PC Builder is a participant of the Amazon Associates Program, through which we earn advertising commission on qualified sales by linking to the Amazon products.
Customer Reviews
vince
Pros:Crazy good deal ($32 after a $5 mir and prime)Crazy lightCrazy simple (no bells or whistles, and didn't have any issues with screws or hardware, though cheap thumscrews always suck - either get a good set of them if you're always opening the case, or just simply treat them as philips head screws)Black sprayed inside (luckily this has become a norm, but is still a pro)THE GRILL - Honstly I absolutely love the grill on the front of this thing. They have a GREAT, simple design to pop it off (the tab at the bottom) and ya...I absolutely love that about it. Most front faces on cases are a pain. That does bring me to my first con, however, but it is very minor:Cons:The plastic cd rom bay covers - I don't use dvd or cd roms anymore, so I keep the plastic inserts in. They need to be (carefully, but strongly) pressed outwards to give them more grip, otherwise they fall into the case with the slightest touch. It's a decent design, though - just needs a bit of coersion.The fan isn't great - but it isn't all that loud as I've seen in a few reviews, though I suppose that's subjective. If it was an HTPC, I would certainly suggest getting quiet, nice fans - but this isn't even really a con. If you're expecting to get good fans at the price of this case, you're nuts. Go and pay like $5-10 per fan. You'll want a second one for the back of the case anyway.Some might think it's a con that it has no upper fan support, or the fact that it is a top mount psu setup - meh... the way the cd rom bay is in front of the psu - it makes for a great bundle-hider if you use a non modular psu like I did (this would be harder with a dvd/cd rom, though.)Overall 10/10 case. I have been building computers for over 10 years. This is honestly one of my favorite cases I've used, if not my favorite simply due to the price. I put this whole matx build together for a total of $120 (onboard video) - and if I felt like it, for an extra $150-200 - it could be a formidable gaming rig.I also have an htpc built with Silverstone's ml03b - which I love as well. There isn't as much to be said about that case, though - it's just a box. Pretty simple design. It stands out though because not only does it look like a piece of home audio equipment, it can house 4x 80mm fans (I got enermax uc-8eb's, and they are seriously incredible, silent fans by the way.)I don't like bells and whistles. I also like light cases. I also like cheap cases. This fits all those bills, and is easily one of the nicest looking "mini tower" style cases out there. A lot of times they're very cheap and boring looking, almost like a corporate desk job Dell box or something.
Jon L
Cheap case, metal bends easily. Not too many sharp edges encountered.Case looks nice, but as it's cheaply built/painted, you have to be extremely careful to not scratch it, as the black paint scratches off very easily.If the paint were of a higher quality/finish, I'd likely give the case 2 more stars, as I knew I wasn't getting high quality metal for the price, but I didn't realize the paint job would be as easily removed as it is.Important notes:- no power supply included (I knew that, but just mentioning)- front USB ports are USB 3.0, but the case doesn't include a 3.0 to 2.0 adapter for USB 2.0 motherboards. I had to purchase one separately for a legacy motherboard that was transferred into this case.- the rear PCI slot covers are not replaceable, it's breakaway covers, so once you remove the pci slot cover, you have a gaping opening if a PCI card isn't installed.Other than mentioned, case seems fine. Has all the necessary connectors (aside from USB 2.0 connectivity). The Power LED plug is split into it's respective + & - connectors, which should solve situations where some motherboards have a 3-prong Power LED, others have a 2-prong Power LED.
M. Lam
Got this at under $36 with Prime shipping which is a steal. Last one in stock. WOOT!Pros:- USB 3.0 ports on the front. Seriously the only case under $40 that has this feature.- Looks sleek and sexy - I really like the mesh grill design.- High quality optical drive covers and front fan grill that snaps in and out with quality- Motherboard backing cutout if you want to add/remove CPU cooler later.- Built in SSD 2.5" mounting point on bottom of HDD bracket. Great for budget SSDs that don't include a 3.5" to 2.5" conversion bracketCons:- VERY cramped inside with NO cable management.- Says it supports 14.1 inch long cards...FALSE. The longest graphics card you can fit inside is 9 INCHES, because of the limitation of the opening between the back of case and the walls of the HDD cage. My 8.75 inch long graphics card barely fits inside. Don't even think about SLI or Crossfire, because you'll choke your graphics card - no space for airflow if you have two cards stacked on top of each other. The image on the Silverstone site showing this is a joke.- Stamped steel PCI covers means you HAVE to remove them before installing your motherboard..Otherwise you have a tough time twisting and popping them off after your motherboard is installed - and risk damaging your motherboard.- Side panel thumb screw holes don't line up that well with their corresponding case holes, so the so-called "thumb screws" really require a Phillips screwdriver to properly install or remove.- Limited cooling capacity with 1 80mm front fan (optional), 1 120mm front fan (included), and 1 92mm rear fan (optional) locations. Only supports up to 140mm tall CPU coolers...Wish they had optional side and top fan mounts. I would avoid putting anything over 100W TDP inside here, especially if you're only using stock coolers. Better stick to 77W TDP or below for CPUs - so that means Ivy Bridge i3/i5 or Sandy Bridge i3. Even my 55W TDP i3-3220 idles at 38C (external temp 25C) with the stock Intel cooler and 1 included front Silverstone fan at full speed. I'm going to have to add additional fans.Tips: Follow this order of installation to have a better time than I did:1) Perform an open-air test for new builds to check that your PC vitals are working before installing the motherboard into the case. This involves CPU + CPU Cooler + motherboard + RAM + GPU + PSU + display + keyboard. After you are sure everything is working, remove everything from the motherboard except the CPU. Yes, that means you need to remove your RAM and your CPU Cooler as well - don't leave them installed!2) IMPORTANT! Locate which PCI covers you need to have removed based on the PCI cards you are installing and twist and remove the stamped covers before installing anything else.3) Install PSU into case. It's a top-mount location so best if you have a modular PSU meant for that application. I used a non-modular type and it went okay - just a lot of wire-octopus to hide behind the HDD cage.4) Install optical drives. You might have to cut and/or reposition the zip-tie for the PSU cables if you are using a non-modular PSU, because there's not much space between the PSU and the optical drive slots, and you'll have to bend the cable octopus downwards.5) Install motherboard standoffs and then the motherboard. Remember this only supports microATX and miniITX motherboards. Do NOT install CPU cooler or RAM yet6) Install HDD(s). Be very careful not to bump anything on the motherboard. It's very cramped here so take your time and be careful. If you were lazy and did not remove your RAM or CPU Cooler, you're gonna have a tough time getting the HDD in. Subsequent HDD installations will REQUIRE you to remove both RAM and CPU Cooler - you just won't be able to angle in secondary/tertiary drives when other HDD(s) are already installed.7) Install the CPU Cooler and RAM.8) Install graphics card and other PCI cards9) Install SSD if you have one10) NOW do all the SATA, Molex, etc cable routing and cleanup.
More Related Products

Fractal Design Meshify Mini C Tempered Glass
case
Fractal Design
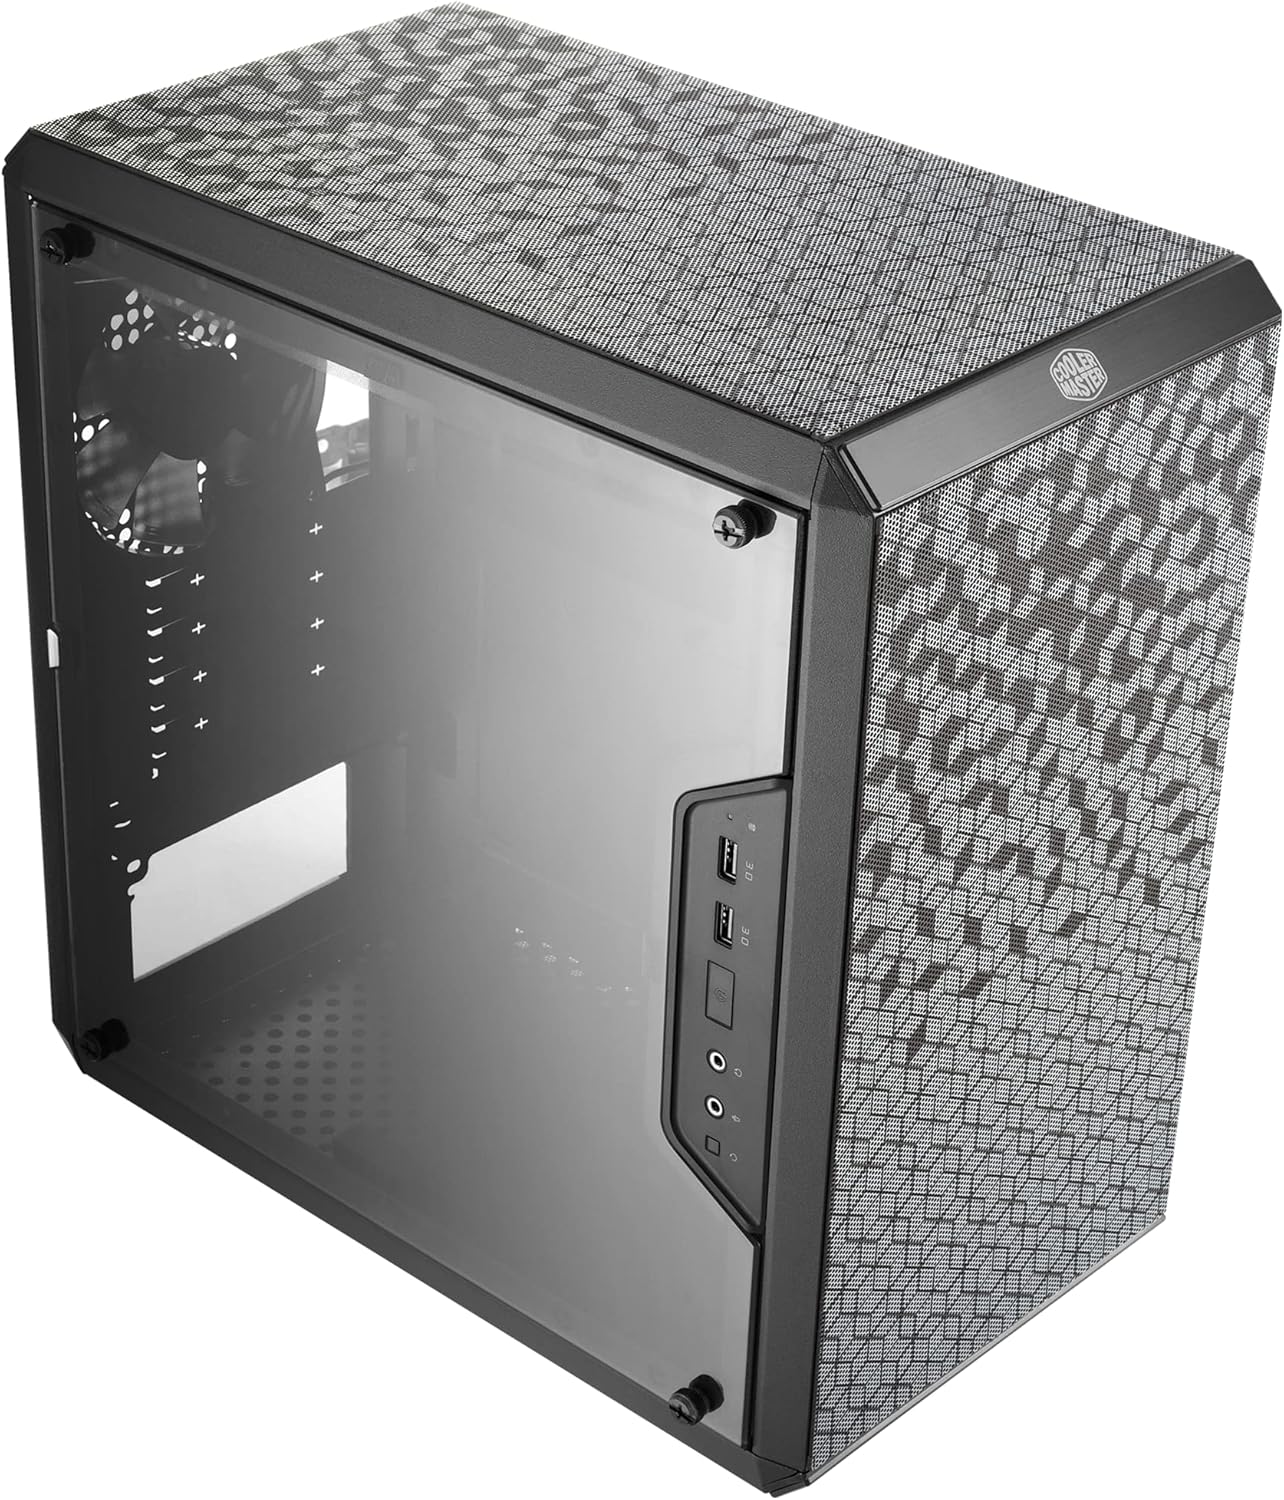
Cooler Master MasterBox Q300L Micro-ATX Tower with Magnetic Design Dust Filter, Transparent Acrylic Side Panel, Adjustable I/O & Fully Ventilated Airflow
case
Cooler Master

Asus ROG Strix TRX40-E Gaming AMD 3rd Gen AMD Ryzen Threadripper sTR4 ATX Motherboard with 16 Power Stages, Onboard WiFi 6 802.11Ax, 2.5Gbps, USB 3.2 Gen2, 3X M.2, OLED and Aura Sync RGB Lighting
motherboard$599.95
ASUS

MSI Creator TRX40 Motherboard (AMD sTRX4, PCIe Gen4, M.2, USB3.2 Gen2x2, DDR4, 10G LAN, Wi-Fi 6, eATX)
motherboard
MSI

Corsair CX 650 Series, 80+ Bronze Certified 650W Modular Power Supply
power supply
Corsair

Corsair CX Series, 80 Plus Bronze Certified 550W Modular Power Supply
power supply$148.68
Corsair
More Related Products
Fractal Design Meshify Mini C Tempered Glass
case
Fractal Design
Cooler Master MasterBox Q300L Micro-ATX Tower with Magnetic Design Dust Filter, Transparent Acrylic Side Panel, Adjustable I/O & Fully Ventilated Airflow
case
Cooler Master
Asus ROG Strix TRX40-E Gaming AMD 3rd Gen AMD Ryzen Threadripper sTR4 ATX Motherboard with 16 Power Stages, Onboard WiFi 6 802.11Ax, 2.5Gbps, USB 3.2 Gen2, 3X M.2, OLED and Aura Sync RGB Lighting
motherboard$599.95
ASUS
MSI Creator TRX40 Motherboard (AMD sTRX4, PCIe Gen4, M.2, USB3.2 Gen2x2, DDR4, 10G LAN, Wi-Fi 6, eATX)
motherboard
MSI
Corsair CX 650 Series, 80+ Bronze Certified 650W Modular Power Supply
power supply
Corsair
Corsair CX Series, 80 Plus Bronze Certified 550W Modular Power Supply
power supply$148.68
Corsair